In this tutorial I will be showing you how to set up the Kria KV260 board by Xilinx and run a pretrained model(ResNet50) in the DPU. Xilinx has provided instructions on how to set up, load and run the model in their documentation and in their Github page. But the required commands are present for the different products that Xilinx offers along with Kria KV260 which is a Zynq® UltraScale+™ MPSoC. Since the Xilinx document is highly thorough and contains different pages, for the first time users it’s difficult to search and find sequential order of required data/commands for running these models on the KV260. Also, there are some more things to take care of prior to starting which I will be showing in this article.
Step 1: Download and burn the board image
- Download the board image for KV260 by clicking on this link: https://www.xilinx.com/member/forms/download/design-license-xef.html?filename=xilinx-kv260-dpu-v2022.1-v2.5.0.img.gz
- Use any desired software(I used Balena Etcher) to burn the image file onto a micro SD card
- Place the micro SD card onto the micro SD card slot in the KV260
Step 2: Setting up the serial port on linux
- Connect the cable to the micro USB/JTAG port and the ethernet from the host(our Linux machine) to the target(KV260), power supply(12V), hdmi cable for monitor(optional), keyboard(optional) and mouse(optional) to the board
- For serial port connection using USB-UART we can use putty or minicom
- Xilinx documentation gives PuTTY command for serial communication, but when I used PuTTY the serial port was not detected. So I used minicom as an alternative
- For minicom, in the host type: sudo apt-get install minicom if it not installed in your system
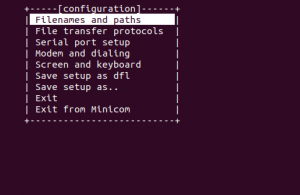
- Then type: sudo minicom -s (which opens the following script in the terminal window)

- Using cursor select Serial port setup and make the following changes and press enter. Note: In my case I found the connection at /dev/ttyUSB1 which was at device number 1. If it’s not connecting, try using different device number as it may be different for different system

- After exiting, the serial connection terminal to the target(KV260) is established and opened
Step 3: Set up and boot the board
- Power on the power supply which automatically boots up the board
- “petalinux” is the default username and password of the board. If the board asks for these credentials after booting, apply these
- The board may prompt to change the board’s password in which case, set one.
- In my case the board automatically logged in as root and since in the later steps we need to provide the board’s password to the host linux machine for running the Vitis AI examples in the board by sending files from the host to the target through ethernet, we need to set one password( “petalinux” wasn’t the password in my case)
- To set a password for our board we need to type:
- passwd (if logged in as root) or sudo passwd(if not logged in as root)
- Then type in a new password, press enter and retype it

Step 4: Set up the IP address
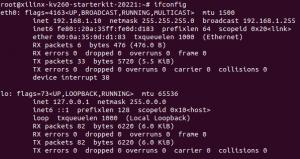
- In the start, the board ethernet(eth0) will not have any IP address set. To check type: ifconfig
- To set up the IP for ethernet(eth0) type: ifconfig eth0 <new IP address> (In my case I set it as 192.168.1.10 and to verify if the IP address is set, again type ifconfig (notice now inet 192.168.1.10 is appearing)

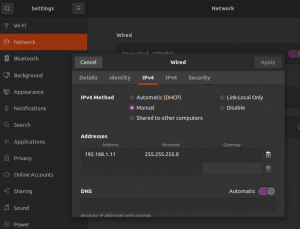
- The host machine’s IP address also needs to be set (sometimes the host machine’s wired IPv4 method might be automatic(DHCP), so we might not be in the same family of IP addresses). So go to Settings > Network > Wired > IPv4 and do the following changes ( I used 192.168.1.11 and set the netmask according to the target’s netmask which can be found through ifconfig command on the target’s serial terminal)

Step 5: Download necessary files from the host to the target and run
- For example, let’s run the ResNet50 pretrained model on KV260.
- For this purpose download the necessary file by clicking the link on the host machine: https://www.xilinx.com/bin/public/openDownload?filename=vitis_ai_runtime_r2.5.0_image_video.tar.gz
- Then cd to the Downloads directory or any other directory where the downloaded file is stored
- Send the downloaded file from the host to the target. Type: scp vitis_ai_runtime_r2.5.*_image_video.tar.gz root@192.168.1.10:~/
![]()
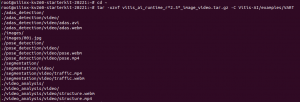
- Change to root directory with cd ~. Unzip the downloaded package on the target using: tar -xzvf vitis_ai_runtime_r*2.5*_image_video.tar.gz -C Vitis-AI/examples/VART

- Change to the following directory where the examples are stored: cd ~/Vitis-AI/examples/VART/resnet50 (I have taken resnet50)
- Now, everything is ready. Run the example by typing: ./resnet50 /usr/share/vitis_ai_library/models/resnet50/resnet50.xmodel

- The ResNet50 model predicts image 001.jpg as brain coral with a confidence of 98%
References:
- https://github.com/Xilinx/Vitis-AI
- https://github.com/Xilinx/Vitis-AI/tree/master/setup/mpsoc#step1-setup-cross-compiler
- https://www.xilinx.com/products/som/kria/kv260-vision-starter-kit.html
- https://www.xilinx.com/products/som/kria/kv260-vision-starter-kit/kv260-getting-started/getting-started.html
- https://github.com/Xilinx/Vitis-AI/tree/master/examples/VART
- https://github.com/Xilinx/Vitis-AI/blob/master/examples/Vitis-AI-Library/README.md

